Nov 29, 2010

{daring bakers: rustic apple crostatas}

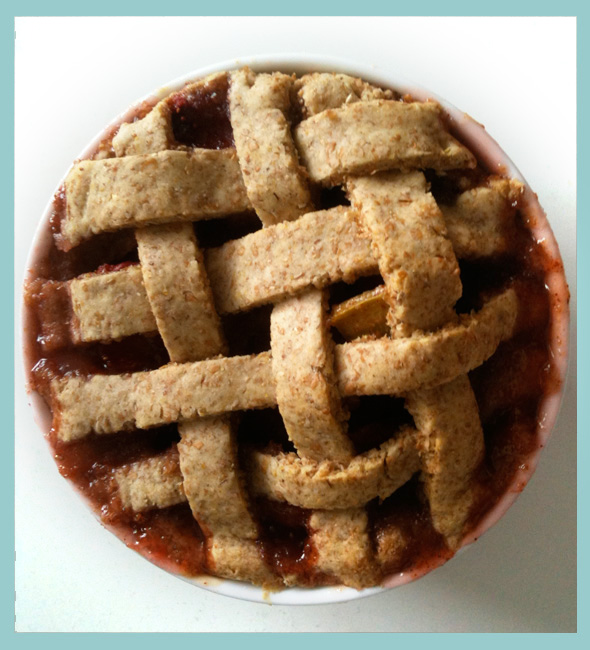
The 2010 November Daring Bakers’ challenge was hosted by Simona of briciole. She chose to challenge Daring Bakers’ to make pasta frolla for a crostata. She used her own experience as a source, as well as information from Pellegrino Artusi’s Science in the Kitchen and the Art of Eating Well.

This months Daring Bakers challenge was crostatas or tarts. Tarts are made up of a sweet short crust pastry dough and either fruit or pastry cream based fillings. With Thanksgiving coming up I decided to make an apple tart and since I had no tart pan, I went for the rustic look (which I think adds to the homeyness of it all). I adapted my filling recipe from Joy of Baking and used one of the pasta frolla recipes provided.

It was quite an adventure.

I wanted to serve the tarts on turkey day which meant I needed to assemble and bake these babies day of. I planed ahead with the hostess to make sure there would be space for me to work/bake and discovered she had three ovens! Awesome. I prepped my pasta frolla the day before and brought it with me along with the rest of the ingredients. After rolling out my dough, filling my tarts and folding over the rustic edges, I was ready to bake. I went to place my pan in the oven and what do you know, it doesn't fit! Not to worry, I thought, I'll go pre-heat the big oven downstairs and bake it in there. So, I place my tarts back in the fridge so they stay firm and run downstairs. Since there was no light indicator as to whether or not the oven was pre-heated, I decided to give it a half hour to get hot. Once the time had passed, I walked downstairs precariously holding my tarts and placed them in the oven...which wasn't really that hot but I figured it would be okay. Using my trusty iphone timer I set it for 30 minutes and walked back upstairs to mingle. The alarm goes off. I happily hop downstairs to check on the tarts and what do you know, the oven was warm enough to keep a plate warm and make my dough gooey. Fantastic. So along with some help I try to transfer the tarts to a smaller baking pan...let me tell you...gooey dough does not transfer. Thankfully, a fellow daring baker was there to advise me (and help me remain calm!) to place the pan back in the fridge to firm up again before transferring it to a smaller pan. This worked wonderfully and we ended up having the tarts with the late night turkey day snack.

Despite the bumps along the way, everything came out pretty delicious. I really loved the crust and the filling was nice and lite. I will definitely be making these again as I thought the whole process was actually fairly simple. Thank you Simona for a fun challenge!

See more pics and the recipe after the jump.

Oct 27, 2010

{daring bakers: donuts}

The October 2010 Daring Bakers challenge was hosted by Lori of Butter Me Up. Lori chose to challenge DBers to make doughnuts. She used several sources for her recipes including Alton Brown, Nancy Silverton, Kate Neumann and Epicurious.

So, I have taken a couple month hiatus from daring bakers/cooks as work has picked up and I just needed a break. I am back and ready to go for this months challenge and was very excited when I saw that we get to make donuts! It is a rare treat for me to have a donut...typically just walking by a Krispy Kreme or Dunkin Donuts and smelling the aroma is enough for me to gain 5lbs. The only mandatory item for this months challenge was that we make donuts; they could be any flavor, filling, topping we wanted. Lori was kind enough to include a recipe for pumpkin donuts in this challenge and well, I'm all about some pumpkin in the fall. Pumpkin beer, pumpkin coffee, pumpkin bread, pumpkin cookies...if pumpkin is in the name, I will eat/drink it. I have never had pumpkin donuts, but well, they sound delightful. This is the first challenge that on the day of posting, I had both the time and ingredients to put it all together! Also, John was coming home from a week long business trip and I thought it would be a fun surprise to have them waiting for him.

The methods used for cooking the donuts in each recipe Lori gave us was to fry them. Since I'm not a fan of a vat of grease and I wanted to make these as "healthy" as possible so I found some recipes online where people baked the donuts. I made a half batch of the pumpkin donut recipe provided (since it is only the two of us indulging) and found a cinnamon glaze recipe for my topping. Since I had a few chocolate chips left over from making pumpkin chocolate chip cookies I decided to add them to half of my recipe to see how that tasted.

The overall process of making the donuts was incredibly simple. Just keep in mind that you need it to chill for at least 3 hours before baking/frying. My end result...to die for as far as taste goes. I could live off of these babies. They did not however maintain their very puffy rounded shape and turned out to look more like cookies. I blame it on using a cookie sheet instead of with a donut mold. Thanks for a great challenge Lori!

Check out pics after the jump.
To see the full recipes and what others did check out The Daring Kitchen.

Oct 14, 2010

{october daring bakers: stuffed grape leaves}

Our October 2010 hostess, Lori of Lori’s Lipsmacking Goodness, has challenged The Daring Cooks to stuff grape leaves. Lori chose a recipe from Aromas of Aleppo and a recipe from The New Book of Middle Eastern Food.

For this months challenge we had to make a filling and then stuff and roll it into grape leaves. A Mediterranean restaurant is the only place I've ever eaten stuffed grape leaves before and I've always thought they were pretty delicious. Never once did I think to actually try making them so, I was very interested to see how this would turn out.

Work has gotten pretty busy lately (thus my lack of posting) so when it came to be the week before our post date, I began to wonder if I'd even be able to participate in this challenge. When a friend of mine suggested we tackle this one together and have a full blown Mediterranean meal, I jumped on it. We each brought our ingredients together in order to make the Wara Einab or Dolma (cold stuffed grape leaves). The men grilled the lamb while we separated, filled and rolled the dolmas. It definitely was a process and one I'm glad to not have done on my own. The grape leaves were a bit fragile as the slightest poke of a fingernail tore them. Towards the end we were double wrapping the grape leaves in order to make a whole one. They turned out delicious though and went very well with the hummus, pita, roasted veggies and lamb.

Check out the recipe and what other daring cooks did over at The Daring Kitchen.

See more pics after the jump.

Aug 14, 2010

{daring cooks: pierogi}

The August 2010 Daring Cooks’ Challenge was hosted by LizG of Bits n’ Bites and Anula of Anula’s Kitchen. They chose to challenge Daring Cooks to make pierogi from scratch and an optional challenge to provide one filling that best represents their locale.

One of my good friends has been raving about how awesome pierogi are ever since I met her and introduced her to climbing. It seemed like after each climb night she said she was going home to eat pierogi. She was astonished that I had never heard of them or had them before and stated that she had to make them for me. Sadly, I moved before we could set that up so, you can imagine how happy and excited I was to see this months challenge. Finally, I'd get to have pierogi! (kface I've been dying to tell you that it was this months challenge!)

So, what is a pierogi? It is basically a dumpling filled with deliciousness. For the challenge, we had to make the dough and filling from scratch. Pierogi can be either savory or sweet so I chose to lean more to the savory side of things for John's sake. LizG provided a few recipes but said that we should adjust our fillings to include something that represented where we are from. So, my fillings ended up being: twice baked potato, chicken basil pesto and sweet potato. I did manage to sneak in a little sweetness on the last one, but still served it as part of our dinner, not dessert. After all, sweet potato soufflé is usually served as one of the many sides my family consumes during the holidays, even though its sweet enough to be a dessert. I chose these because here in North Carolina, sweet potatoes are a big agriculture product, chicken (which is usually fried in the south) is loved down here, and well, potatoes are just good.

I made a few adjustments to the recipes provided based on what I had on hand and what I could get locally. For the dough, all-purpose is called for but I got away with using whole wheat pastry flour and it came out just fine. I did a double batch of the dough recipe since I wanted to try several different fillings and still had filling left over! Thankfully, this dish is easily frozen and we now have a few bags of pierogi awaiting a night I don't feel like cooking.

In filling them, I found that the potato versions were very easy to do. The chicken version however liked to poke through the dough and cause problems so just a note if you choose to make these with some sort of solid filling. I'd just roll your dough a little thicker to protect it.

Since the recipe made so many, it took a while to fill them all up. I ended up filling what we were eating that night and cooking those first. While they were boiling, I worked on filling the rest. It takes a little time, but for the amount you get, its worth it.

I tried to keep all of the varieties separate from each other so I'd know what I was serving, but after the boiling step they got all mixed together. After boiling them I popped them in a little olive oil and sauteed them up to brown them a bit. This also warmed the ones that had boiled first. I had no sour cream or any idea of what kind of sauce to put them in so we enjoyed these plain. They were delicious! It was kind of like a treasure hunt since we didn't know what we were going to be biting into. John's favorites ended up being the twice baked potato and chicken basil pesto versions. I loved them all.

See more pics and the recipe after the jump. See what other Daring Cooks did here.

Jul 27, 2010

{daring bakers: swiss swirl ice cream cake}

The July 2010 Daring Bakers’ challenge was hosted by Sunita of Sunita’s world – life and food. Sunita challenged everyone to make an ice-cream filled Swiss roll that’s then used to make a bombe with hot fudge. Her recipe is based on an ice cream cake recipe from Taste of Home.

Upon first sight of this months swiss swirl ice cream cake challenge, my thoughts were as follows: I get to make ice cream!!! Wait. I have to make swiss rolls as well? Like those little debbie ones I loved as a kid? And then combine it all?! Okay, a kid HAD to have made this up and then an adult just made it pretty...who else would have come up with combining swiss rolls and ice cream but a kid?

So, yes, that was my thought process pretty much exactly. I was very excited to get started so I began brainstorming my dream combinations of ice cream flavors. Strawberry + lemon, blueberry + lemon, mint + chocolate, mint chocolate + coffee, mint + chocolate cinnamon, chocolate coffee + mint...the list went on. I have determined that I will make all of these flavors at some point or another. For this challenge though, I chose to do a chocolate espresso + mint ice cream along with a mint cream filled swiss roll.

It was quickly evident that I would not be able to make this dessert with entirely locally sourced ingredients so, I did the best I could and at least used my own fresh mint from my container garden. My other challenge was that I am a bit lactose intolerant which is very sad as I LOVE ice cream. I do sometimes indulge in the occasional ben & jerry's just to ya know, "test" my stomach out. I savor every single bite and then about 5 minutes later, immediately regret my decision. Thankfully, a friend of mine has the book The Vegan Scoup on her iPad and was able to send me over a few of the recipes I needed to make my concoction. Let me tell you, ice cream is incredible simple to make without an ice cream maker! You just need to have an entire day that you will be home so you can babysit it. Totally worth it in my opinion.

As this challenge had so many components (the ice cream (two versions!), swiss rolls, hot fudge sauce and then assembly which had several steps of letting it freeze for hours) I had to break it down into a several day process so that my brain wouldn't explode. I started with the chocolate espresso ice cream to make sure it would work. It did. I enjoyed a bowl that evening. The following day I made the mint ice cream. Delicious. The green leaves even turned the ice cream a light mint color! I then took a day of rest to build my courage to create the swiss roll as I'd heard too many horror stories with it not working from other daring bakers.

Took another day to build more courage.

Finally got the courage to try it on the 5th day and was very hopeful. I'd read all sorts of tips from others and felt I was ready to face the challenge. Everything mixed nicely and remained fluffy. It baked beautifully. It even came off of the parchment paper without too much trouble. I was feeling very happy and wondered what all the fuss had been about. I rolled it up nicely in my towel and left it to cool for the two hours recommended. A few minutes before it was ready to be filled I made my mint cream filling and then sat down to do my unrolling. It went okay as I unrolled but I noticed it cracking a bit. I figured it was okay and kept on going. Added the mint filling and began to roll it back up without the towel this time and well...DISASTER. A thin amount stuck to the towel and did not come up which caused the cake to crack even worse. Lets just say at this point, the day before our challenge is due, I just gave up and kept on rolling it. Somehow I got it wrapped in plastic and placed in the freezer hoping it would take some shape and allow me to cut it. Thankfully it did and I was able to slice it up nicely and begin assembling the masterpiece.

The assembly process was fairly easy, it just took forever for each layer to freeze. I must say that the end result was absolutely worth the long drawn out saga. The flavors combined delightfully in my mouth and I think I could eat this every day. In the end, I don't know if I'd ever make this entire thing again. I will definitely be making more ice creams, but just not sure about doing the whole thing all over again. Thank you Sunita for an awesome challenge! It was perfect for this ridiculous summer heat we've been having.

Visit the Daring Kitchen for the original recipes and see what others created. Check out more pics and my recipes below the jump!

Jul 14, 2010

{daring cooks: nut butter}

The July 2010 Daring Cooks’ Challenge was hosted by Margie of More Please and Natashya of Living in the Kitchen with Puppies. They chose to challenge Daring Cooks to make their own nut butter from scratch, and use the nut butter in a recipe. Their sources include Better with Nut Butter by Cooking Light Magazine, Asian Noodles by Nina Simonds, and Food Network online.

I was really looking forward to this months challenge of making a nut butter and then using it in an entree So was John. He was ready for a daring cooks challenge that was super savory and this one was it. The challengers gave us several recipe options to use our nut butters in. The nut butters could be made of peanuts, cashews, almonds or whatever nut we wanted. I had just made some peanut butter and as peanuts are easy to get locally, I went with that for my nut butter. You can check out my previous post on making peanut butter here. For my entree, I chose to go with the Asian Noodle Salad with Peanut Dressing recipe. Let me tell you, I could eat that dressing by the spoonful! It was absolutely one of the best things I've ever tasted and paired with the rest of the ingredients, it was wonderful. I highly recommend making this sauce and just spooning it over everything you eat. The recipe made more dressing than was necessary for the dish but it refrigerates well and can be used in a variety of other dishes.

In order to make this dish entirely local, I switched up some of the ingredients to make my own version. I loved how easy it was to make it from all local and fresh ingredients...it really added to the scrumptiousness of it all. The sauce would not have been easy to make using all local ingredients except that I already had the soy sauce, sesame oil, sugar and ground ginger on hand.

Since beginning our locavore challenge, we have run out of noodles so, for the first time in my life, I made from scratch pasta!  I was super excited to give this a try and found a simple recipe over at the Food Network website. It required a good bit of kneading with gave my forearms a workout. I'm sad to say they were even sore the following day! I am so happy I'm climbing again now that we've moved one mile from the climbing gym. I will no longer be shamed by making pasta again. Anyway, I have no pasta roller so this stuff had to be rolled out with my awesome long rolling pin. I think it needed to be a little thinner but my arms were done. The pasta on its own was pretty delicious and a lot of fun to make. I did a half recipe of the pasta since that was all the flour I had left. It made plenty to serve us four times.

To get the original recipe and other options we had, check out The Daring Kitchen.

See my version of the recipe after the jump

Jun 28, 2010

{vegetable + meatball soup}

This is my second attempt at a vegetable soup and I think I finally got it right. This soup was absolutely delicious and I think one of the best things I've ever made. Since I had ground beef I decided to add a few meatballs to the mix but you could easily leave them out and sub a vegetable stock for the chicken stock to make this vegan. You could really put any veggies you have on hand into this and it will come out good.

Recipe and pics after the jump

{local pops}

Summer is here and with that comes the lovely days of 90 and 100º weather. Blech. Thankfully, I found some recipes out there to make fruit popsicles that are both healthy and refreshing. I was inspired by these delicious looking treats and decided to use the raspberries and blueberries I'd picked up at the market to try my own version. You could make these without adding any sweetener but I had some local honey on hand and decided to add in just enough to take out the bite...especially with the raspberries. I highly recommend using molds that have no funky shapes or dips like I did with my raspberry molds...it made it terribly difficult to get out of the glass after it had frozen. My favorite was the blueberry version...perfectly refreshing and scrumptious. The raspberry version ended up not having quite enough honey in it so it had a little bit of a bite. If you make these, just taste them once its all mixed up before putting into the molds to make sure the sweetness factor is to your liking. As we are moving south this week, these will definitely become a staple in our freezer to help us survive the hot summer months.

Recipe and pics after the jump

Jun 27, 2010

{june daring bakers: blueberry pavlovas}

The June 2010 Daring Bakers’ challenge was hosted by Dawn of Doable and Delicious. Dawn challenged the Daring Bakers’ to make Chocolate Pavlovas and Chocolate Mascarpone Mousse. The challenge recipe is based on a recipe from the book Chocolate Epiphany by Francois Payard

This months challenge was to make chocolate pavlovas and chocolate mascarpone mousse. As I am trying to make each challenge using as local of ingredients as possible, I am happy to say that I only had to go out and buy the heavy cream and mascarpone cheese. Granted, we did make mascarpone cheese in the Tiramisu daring bakers challenge back in February, but I really didn't want to go through the trouble and end up with butter again so I bought it instead. I discovered that yes indeed, I had made it incorrectly during that challenge...oh well. So, getting back to this challenge, at the market last Saturday I discovered that blueberries had come into season. I was so excited that I bought several pints...these have to be the best blueberries I've ever eaten in my life. For the challenge I decided to use them to make a blueberry meringue, blueberry mouse and the mascarpone cream drizzle.

I decided to do a half recipe since it was going to only be John and I eating this. Sadly, we still had too much. My changes to the original recipe were basically doing a straight substitute of the chocolate for the blueberries. To prepare them, I simply pureed them in my tiny food processor so that they would mix well with all of the other ingredients. The nice thing about this dessert was that it was fairly easy to make and put together. The longest portion was waiting on the merengues to cook but let me tell you, crispy blueberry merengues absolutely melt in your mouth. It was like cotton candy in crunch form. I would have been fine just making and eating those! The mouse was also pretty delicious and the blueberys flavor came through nicely. It all combined to make an absolute delight in the mouth. John, who doesn't usually enjoy sugary sweets, LOVED these.

Check out the pics and recipe after the jump

Jun 24, 2010

{potato, squash and goat cheese gratin}

As more items are becoming available at our local farmers market, I'm having to stretch my imagination further to figure out what to make with it all. Its not that there are no recipes out there, on the contrary, there are too many and I can't choose. The other issue I've been having is in trying to stretch our meat supply since it tends to be the more expensive portion of our weekly food budget. I've been able to successfully make a couple vegetarian dishes a week that John approves of and fills us up adequately. However, since we are not vegetarians and I've never done much vegetarian cooking, I'm having a difficult time knowing where to look and knowing if the dish will be filling enough. Thankfully, the other day as I was surfing around on The Kitchen, I found this delicious looking vegetarian dish using ingredients I had picked up from the market. I decided to add some onions into the mix and only used about one third of the cheese it called for since I was saving the rest for the summer pizza. Served with a salad, the meal ended up being quite filling and we were able to get 3 servings out of it. It would work great as a side dish as well, but we were both pleased with it as the main course. I would add all of the cheese it calls for though as it will only make it taste better.

Recipe and pics after the jump

{summer pizza}

We are a huge fan of pizza. Me even more so because its one of the simplest things to put together for dinner and it usually comes out tasting quite delicious. Also, I can usually make it entirely vegetarian and John doesn't complain. I call this one the summer pizza because it uses delicious ingredients that are in season during the summer (creative, I know): yellow squash, tomatoes + onions. Paired with some fresh basil and goat cheese this pizza will just melt in your mouth. Since I'm more a fan of thin crust I found a recipe that required no yeast and no rising time and adapted it to what I had on hand. The original recipe can be found here. I'm not entirely sure what salad oil is so I used olive oil instead. Below the jump is my version of the pizza crust recipe and pizza.

Pics and recipe after the jump

Jun 22, 2010

{stuffed yellow squash}

Yellow squash is in season! Yay for color and something new! I've seen several stuffed squash recipes that looked delicious so I figured it would be easy to mix up something on my own. I have to say that this recipe turned out just wonderfully. In fact, we have now added it to our list of favorites. We ate this on its own and it was just barely filling enough. Next time I think I'll add in a side of veggies or a salad to help complete the meal even more.

The goat cheese added a nice flavor to the overal taste but when I try this again, I think adding in even more goat cheese and/or sour cream will help keep the meat a little more moist. Once I had combined all of the ingredients, I realized that I could have gotten away with using even less than 1/4 lb of beef since there were so many other things going into the mix. As the summer veggies continue to come into season, I think we will be trying several different variations of this...I could see using chicken, tomatoes, zucchini and peppers with some italian spices. mmmm, I'm hungry.

Recipe after the jump

Jun 21, 2010

{ketchup}

Ketchup is a staple ingredient in our household. As we began the locavore challenge, one of our rules was that we would not go to the store before hand to stock up on anything...we would just continue on with what we had on hand and when it ran out either make it or do without. Well, last week we ran out of ketchup and now that potatoes are coming into season, well, we must have ketchup. John has taken on the responsibility to create any condiments or staple items that we might need such as chicken stock and in this case ketchup. So, on Saturday we drove out to a nearby market located on the side of the road that had plenty of delicious looking red tomatoes. Granted, it is not quite tomato season up here, but this farmer uses a hothouse to grow them during the off-season. We bought 10 tomatoes and headed home to test out our new recipe.

We chose to cut the original recipe into thirds and saw in some other recipes that people had added in some sweetness so we did a hybrid of recipes. We forgot to time how long it took to reduce the mixture a ketchup consistency but it was a while. It was definitely cool to see it go from liquid to a nice thickness. The smells from the spices filled our house with deliciousness. Unfortunately, since we only used one cup of the vinegar it evaporated within the 30 minutes of simmering so, we recommend only simmering it for about 15 minutes. Since the vinegar disappeared, we thought we could just adding another cup into the spice mixture and it would be okay...well once that was added to the tomatoes lets just say that the ketchup had a nice bite of vinegar. Thats when we saw that other people's recipes added in brown sugar or maple syrup so, we decided to give it a try thinking that it might help out with the overpowering of the vinegar. It definitely helped but there is still a strong vinegar taste to it.

The original recipe called for a tablespoons of paprika which we didn't have. We did have cayenne and thought it would be a good substitution for the paprika. We put in a couple teaspoons of cayenne and whew!! spicey! Next time, we will just add a couple dashes.

All in all, it was a fun experiment and we will definitely use the ketchup we made until its gone. Next time I believe we will try a different recipe.

Recipe and pics after the jump

Jun 14, 2010

{daring cooks: pâtés and bread}

Our hostesses this month, Evelyne of Cheap Ethnic Eatz, and Valerie of a The Chocolate Bunny, chose delicious pate with freshly baked bread as their June Daring Cook’s challenge! They’ve provided us with 4 different pate recipes to choose from and are allowing us to go wild with our homemade bread choice.

I've been having so much fun with all of the Daring Bakers challenges that this month I signed up for Daring Cooks. John was particularly happy about this as he prefers the savory over the sweet. hehe Daring Bakers has been my excuse to actually have sweet things around so I figured he deserved a little something too.

Our challenge for this month looked very interesting and was something I've never experienced before. A pâté is basically a meat or veggie based paste that can then be spread onto bread or served with crackers. The meat versions are usually made with liver or gizzards which was just not something that I could stomach making so, I opted for the veggie version. My goal was to create a tricolor vegetable pâté using as many local ingredients as possible.

On a visit to our farmers market this morning we discovered so many more vegetables available! Yellow squash, zucchini, brocoli and garlic were just a few items we were able to pick up. So very happy about the variety being harvested right now! With all of my fresh ingredients in hand I went to figuring out the recipe I'd be able to make for the challenge.

Beans are not something that I can find at my farmers market and peppers are not quite in season so I knew those two layers had to be adapted. Most seasonal ingredients tend to taste good together so I chose to go with a zucchini top layer, carrot and goat cheese middle layer and the basil pesto as my bottom layer. Individually it all tasted pretty good and as as a medley, it was delicious. Since its only John and I, I did a half recipe for the top two layers but a full recipe of the pesto...you can never have too much pesto.

For the bread I used a recipe from my Healthy Bread in Five Minutes a Day cookbook. The honey whole wheat baguette turned out super delicious and was great with the vegetable pâté. It would also taste great served on crackers or with raw veggies. The taste of the pate was so very refreshing...I think I could eat it simply spread on a sandwich slice as my lunch.

I really enjoyed this challenge and it was relatively simple to adapt and create a completely local and seasonal pâté. It was pretty quick and easy to put together which is great since for the next month, my life will be consumed with watching all of the world cup soccer games! GO USA!! Definitely give the recipe a try, it works great as a snack while watching the matches. For the meat based pâtés, original tricolor veggie pâté and baguette recipes, check them out at the Daring Kitchen.

Recipe and pics after the jump

May 27, 2010

{may daring bakers: piece montée}


The May 2010 Daring Bakers’ challenge was hosted by Cat of Little Miss Cupcake. Cat challenged everyone to make a piece montée, or croquembouche, based on recipes from Peter Kump’s Baking School in Manhattan and Nick Malgieri.

This months challenge at first glance was very intimidating. First of all, the title of the recipe was french and then a little googling of what piece montée (aka. croquembouche "crunch in the mouth") looks like revealed these towering masterpieces of puff pastries. The requirements of the challenge were that we had to make our own pate a choux (puff pastry) and crème patissiere (filling). We were allowed to experiment with the flavors of the filling.  Thankfully it was actually a relatively simple process to create the puff pastries and fillings. I say relatively simple because not everything puffed like it was supposed to...I think it had something to do with the humidity in the air today with all the rain we've been having. In the end I was fairly pleased with how everything turned out. I chose to try a few flavors: vanilla, chocolate and rum. My favorite was the chocolate.

Now, my boyfriend and I are continuing our efforts to source everything we eat from within a 100 mile radius, as well as, use up any leftover pantry items we might have had before beginning this locavore challenge. For the challenges of daring bakers, I have decided that I will do my very best to continue using local ingredients, but if I must purchase an item or two from the store, well then I must. For this challenge the only things I had to get as extra were the soy milk and chocolate. My boyfriend pointed out after the fact that we did have cocoa powder that I could have used, but I forgot about it and bought semisweet chocolate chips instead. Other than that, the eggs, flour, butter were all local and all other ingredients I had in my pantry.

It took me a while to find a flour mill that was local, but Virginia happens to have a few of them. Wades Mill is a stone ground flour mill that is a little less than an hour away from our home. Its a lovely drive down a skinny road that passes a winery and several other farms all with green rolling hills. I could totally live out there! (after the jump I've shared a few pictures from the mill and the drive) As I pulled up I saw a large water wheel that I learned is a working power source for grinding some of the flour with the rest being electrically powered. The woman I met in the little shop was very passionate informative of all sorts of issues facing the local farmers. Having worked in the farming industry the majority of her life, she had a lot to say about the issues they face with the term organic. I won't go into it here, but it was really a great experience getting to chat with her. I think thats become one of my favorite things about doing the locavore challenge; getting to speak with the farmers themselves. Anyway, I digress, back to the flour. They have a wide variety of flours you can purchase either online or at the store. Since shipping is almost more than the cost of the flour and I was driving that direction anyway, I chose to stop by. I picked up whole wheat bread flour and whole wheat pastry flour which I used for this month's challenge. So far its been very tasty! I'm still learning the proportion of flour to liquid so that what I make doesn't come out too dense, but I can honestly say its pretty freakin delicious.

Recipe and pics after the jump

May 26, 2010

{strawberry limeade}


Okay, I realize this beverage is not entirely a locavore recipe. We splurged and bought limes to make margaritas the other week and I had some leftover that needed to be used soon. On Tuesday I picked up some deliciously fresh strawberries, so I chose to pair the two and create this refreshing drink. I absolutely loved the color and the flavor was incredible. So light and refreshing. Now, it wouldn't be us if I didn't add a little rum to the mix! It is perfect on its own if you would rather have it non-alcoholic, but the rum doesn't hurt. It also would have been just fine to leave out the limes or exchange them for lemons. As long as you've got strawberries, you can't go wrong.

Recipe after the jump

May 24, 2010

{strawberry rhubarb pie}

FINALLY!! Strawberries are beginning to appear in our farmers market! I cannot tell you how excited I am about this. For two months of seeing only green items, I am thrilled to have some color on my plate. In honor of our first strawberries, I chose to make a dessert. Rhubarb is also in season right now so at the farmers market we picked up a couple pints of strawberries and a bunch of rhubarb to make a pie.


Recipe and pics after the jump

Apr 27, 2010

{april daring bakers: traditional british pudding}

The April 2010 Daring Bakers’ challenge was hosted by Esther of The Lilac Kitchen. She challenged everyone to make a traditional British pudding using, if possible, a very traditional British ingredient: suet.

Suet: the hard fat found around the kidneys and loins of a cow or sheep. When I read this months challenge, I have to admit that I was pretty grossed out by the thought of suet. Thankfully, Esther was kind enough to allow other fat substitutes as well as pretty much any variation on a traditional pudding we wanted, savory or sweet. Sure, suet might be just as bad butter (what I chose to use), but I felt better about using it vs. actual hard fat from a cow.

As I thought about the challenge, I became more excited to try it. John was also thrilled to find out I'd be making something savory this month. As we are taking on the challenge of eating foods produced within 100 miles of where we live, I was very happy to discover I could make this entire challenge with what I had on hand and a few things from the local farmers market. Buckwheat was the flour I used for the crust and since there is no gluten in buckwheat, the crust did not get as crispy as others. It was still tasty, but hopefully after my trip to the local flour mill I will be able to make these again using whole wheat flour. For the inside I used local bratwursts, potatoes and green onions. I used individual sized ramekins to steam the puddings and each one was a perfect serving size. Even though I put some beer and Worcestershire sauce in the pudding, it was not as juicy as I'd imagined. I saw that some people were putting a gravy into their pudding after it had been steamed and think I will try that next time. It was still incredibly filling and full of flavor. Thank you Esther for this challenge!

Recipe and pics after the jump

Apr 20, 2010

{sausage, tomato and goat cheese pizza}

So, it has been a little over two weeks of doing the locavore challenge. We have really enjoyed taking the steps to eat locally grown foods and have learned a few things in doing so. First of all, forget about meal planning for the week when heading to the market. I am hoping this will change as the harvest comes in and the weather gets warmer, but so far our options have been very limited. What we've had to do is basically take stock of what we have on hand and then while at the market plan our meals. Its been fun and challenging as we are not entirely sure what will be on the menu.

Another thing that has happened as a result of the challenge is that we really have discovered whats been hiding in our freezer and pantry. Everything in there is down to slim pickings as I've used most of it to make or supplement our meals. It will at least make moving a lot simpler!

In doing all of this, we have actually been less tempted to eat out because the meals that we do end up making always sound so delicious. Also by eating locally we've decreased the amount of money we've spent on both groceries and eating out. It will be interesting to see if that continues as more fruits and veggies become available. We have found that the most expensive items to buy are the locally grown, grass fed meat products. It makes complete sense and we are happy to spend the money knowing that the animals have been treated like they are supposed to be and they haven't been pumped full of hormones. It has also caused us to get more creative in how we might stretch the use of that meat. All in all, its been exciting so far and I can't wait to have more options than lettuce and butternut squash...although I do heart the butternut squash.

Pizza recipe and pics after the jump

{how to make: peanut butter}


Since starting the locavore challenge I have been eating a lot more peanut butter. I get tired of eggs every morning and haven't found a place to buy oats locally. I could use some advice on other tasty/healthy breakfasts if you've got any! My breakfasts have consisted of toast with peanut butter and honey or strawberry marmalade for the past couple weeks. As a result, I quickly used up all the peanut butter I had on hand. Since we live in Virginia which is known for peanuts I went on the hunt for some. I found my recipe off of wiki and gave it a go. My sad little food processor, which I had been so happy to buy, did not enjoy the process of chopping up the nuts. I was only able to make about 1/3rd of a jar per batch in the processor. The processor needed a few breaks as did my ears during the 5-10 minutes it took.

Recipe and pics after the jump

Apr 12, 2010

{farmers market + carving a chicken}


This Saturday was our first trip to the main farmers market in town. There were many more vendors there compared to Tuesdays market. We were most excited to find meat and cheese vendors as I'd used the last of our frozen meats to make all of last weeks meals. Unfortunately, the main meat vendor was out of chicken so we purchased some round steak, sausage and ground beef. We later discovered a local butcher who carries Polyface Farm chicken and bought an entire bird.

There are still not very many veggies at the market but we were able to buy butternut squash, potatoes, lettuce, goat cheese and more homemade pasta in addition to the meats. I was super sad not to find any tomatoes but hoped that at Tuesdays market the tomato vendor would be there. John was thrilled to discover that there are such things green eggs. We learned there's no difference in taste and that the color varies based on the type of chicken.

More pics after the jump

Apr 9, 2010

{stuffed beef burgers}

Inspired by the Mozzerella Stuffed Turkey Burgers I made a couple months ago I decided to give it a go with the beef I had in the freezer. We had no buns or the ingredients to make them so these were bunless burgers that I topped with a tomato sauce made from the tomatoes I bought at the market. We used up the last of the asparagus and potatoes to finish up the meal. Deliciousness.

More pics and recipe after the jump

Apr 8, 2010

{butternut squash, steak + sweet potato pasta}

At the market on Tuesday I found the vendor Nellies Noodles. They were selling a few varieties of handmade pastas so I picked up the sweet potato one to try out. Since I'm still using what is on hand and the few things I picked up from the market, I chose to pair it with some roasted butternut squash and pieces of steak cooked with some stubbs marinade. It couldn't have tasted more delicious. The textures were very smooth and it was incredibly savory.


More pics and recipe after the jump

{asparagus, steak, oven fries + turnips}


At the market on Tuesday I found one vendor who had asparagus. It was going quickly since it is just coming into season so I bought one of his last few bags. I think every meal during the spring should be served with fresh asparagus as it is one of the most delicious vegetables out there. I cooked mine by sautéing it in a pan with a little olive oil, salt and pepper until they were soft but still had a little crunch. Asparagus is even better grilled, but since we don't have an outdoor space at the moment, the stove top worked just fine.

Recipe and more pics after the jump

Apr 7, 2010

{windowsill gardening}


Inspired by the warming weather and our new challenge of becoming locavores we decided to try our hand at starting our own window garden. We have no outdoor space where we currently live, but we do have large windows with decent light. We bought the book Grow Great Grub: Organic Food from Small Spaces by Gayla Trail and have used it as our instruction manual. It has a lot of great information and once we move to a place with a balcony hopefully we will be able to expand what we can grow. Gayla also has a great blog with plenty of information on getting your own garden started.

We started by planting a variety of sprouts to be added to sandwhiches, salads and soups for seasoning. The sprouts: sunflower, broccoli, radish, onion, black seeded simpson lettuce, spinach, mustard and beet. For our herb garden we are trying tarragon, oregano, thyme, basil, cilantro, rosemary, sage and parsley. We also planted a couple lettuce heads, green onions, jalapeno and sweet banana peppers to grow fully.

So far, most have sprouted and are looking lovely. I can't wait for the herbs to grow in so I can start using them to cook with! I'm not too sure how the lettuce, peppers or green onions are going to hold up, but we will see.

More pics after the jump

Apr 6, 2010

{the challenge of a locavore}


In an effort to eat healthier, fresher foods my boyfriend and I have decided to become locavores. Our goal is to eat locally grown foods within a 100 mile radius of where we live during the months of April to November (prime farmer's market months!). We wanted to do this for several reasons: 1) to eat fresh foods only 2) reduce the distance our food has traveled 3) support the local economy and 4) reduce/eliminate the amount of pesticides and hormonally treated food that we consume. We are allowing ourselves to clean out the pantry and use whatever foods we already have on hand. That's down to mostly condiments at this point because we weren't able to make it to the market this past Saturday. We do plan to support our local wineries, breweries and any local restaurant that also uses local ingredients. We will also have a few ingredients that will be allowed. At this point we are going allow olive oil, salt + pepper, orange juice and rum :D. If and when we do buy those items, they will be organic (except for the rum - that just needs to be alcoholic). We are still figuring out how eating when traveling will work, but so far we are planning to try and eat within 100 miles of wherever we are. If there are no locavore restaurants then we will at least support the local restaurants.

Recipe and more after the jump

Mar 31, 2010

{cheesy, onion, bacon biscuits}

recipe source: The Pioneer Woman
Wow. I remember loving the cheddar biscuits that I got as a kid at Red Lobster but they don't even compare to how delicious these are! Cheese, check. Bacon, check. Onions, check. Gooeyness, check. Flavor, check. Breakfast, check. Rolled into a biscuit form, amazing. The Pioneer Woman has outdone herself with this recipe. I can't think of a thing that would have made it better. The batch lasted us almost a week and is perfect served warm. One was plenty for breakfast for me but John preferred two.

Recipe and pics after the jump.

{butternut squash lasagna}

recipe source: Closet Cooking
To continue the butternut squash obsession I'm having I discovered this great sounding recipe from Closet Cooking for a lasagna that needed to be made. Since I had a lot of leftover mix from the butternut squash, chicken and parmesan pasties I went ahead and used it in this recipe instead of making a whole new batch of everything. It was just the right amount to make a delicious lasagna. The combination of flavors were fantastic and it went down oh so easily. This has to be one of the best bechamel sauces I've ever made. You could easily leave out the chicken to make this vegetarian.

Recipe and more pics after the jump

Mar 30, 2010

{butternut squash, chicken and parmesan pasties}

recipe source: The Kitchn
I am currently on a butternut squash kick which works out nicely since it has been in season. Sadly its on its way out, but I have definitely gotten my fill of it this past month beginning with these: butternut squash, chicken and parmesan pasty (pronounced: past-ee). I found the original recipe over at The Kitchn and have altered it slightly by adding in some chicken.

Pasties originated in the UK as a food for miners since it was a simple hand held pie usually filled with beef, potatoes, onion and turnips. According to Wikipedia, the miners could easily hold the folded pastry with their dirty hands and eat most of it, discarding the last little bits. The thrown away bits were said to please the knockers, mischievious spirits who were believed to play practical jokes on the miners by stealing their tools. Traditionally, the ingredients are placed inside the pastry dough uncooked and are then steamed inside as it cooks. This recipe is not exactly true to the original as most ingredients are cooked prior to placing inside the pastry.

More after the jump

Mar 27, 2010

{march daring bakers: orange tian}


The 2010 March Daring Baker’s challenge was hosted by Jennifer of Chocolate Shavings. She chose Orange Tian as the challenge for this month, a dessert based on a recipe from Alain Ducasse’s Cooking School in Paris.

Spring has arrived! What better way to usher in this wonderful season than with this months Daring Bakers challenge: Orange Tian. I had never heard of this dessert before and in hearing that it was a recipe from France didn't help my intimidation level. I was however, thrilled to see that the challenge was a colorful citrus flavored dessert that looked light and perfect for Spring.

Orange Tian is made of several layers including pate sablee (tart crust), orange marmalade, a whipped cream filling topped with orange segments and a caramel sauce. Our requirements for the challenge were that we had to make the pate sablee, whipped cream filling, marmalade, citrus segments and caramel sauce. We were allowed to play with flavoring and different fruits in the citrus family. Immediately after reading the description I wanted to do a variety of toppings merely for the sake of playing with colors. I also decided to try making a strawberry marmelade in addition to the orange.

Mar 7, 2010

{the first cookout of the year}


The snow is finally melting! We can see the ground and the weather is a lovely 65 degrees. This is our first Spring in the mountains so we are really looking forward to a lot of camping and cookouts as the weather continues to warm. One of our favorite things to grill is hamburgers, so as soon as we realized that Sunday was going to be in the 60's we made plans to have a cookout.

More after the jump

Mar 4, 2010

{buffalo chicken chili}


Whoah mamma this was spicy! Dawn over at Vanilla Sugar posted this recipe and talked about how she had been sick and needed something spicy to open up her sinuses. If this chili didn't do it, I don't know what would. Salsa, spicey bbq sauce and jalepenos...need I say more?

Recipe and pics after the jump

Mar 1, 2010

{slow cooker pepper steak}


recipe source: allrecipes.com
Comfort food. Flavor. Colorful. Tender. This recipe was incredibly easy to put together and came out tasting oh so lovely. The only problem I had was smelling the delicious aromas all day without being able to eat it. I served it over some yellow rice to complete the meal. John was a huge fan of this dish and enjoyed the leftovers for his lunch.

Feb 27, 2010

{february daring bakers: tiramisu}


The February 2010 Daring Bakers’ challenge was hosted by Aparna of My Diverse Kitchen and Deeba of Passionate About Baking. They chose Tiramisu as the challenge for the month. Their challenge recipe is based on recipes from The Washington Post, Cordon Bleu at Home and Baking Obsession.

When I saw that the challenge for this month was tiramisu, I was very intimidated. The amount of steps required to create all of the components of the dessert was a little overwhelming and ended up being the most challenging part. I discovered that the actual assembly of the tiramisu was incredibly simple.

More pics after the jump

Feb 26, 2010

{chili take two}


recipe source: Cooking Light
So since the first chili didn't turn out as well as I'd have like it, I've kept looking for a new chili recipe. I think I have found a keeper. This one was a much better consistency and had really delicious flavors. We are not huge fans of chili powder since it gives us heartburn so I only put in about two teaspoons of chili powder instead of the two tablespoons it called for. I've never had chili that uses red wine it it but it really gave it some nice flavor. Of course it needed more salt than what was called for so if you make it, try to salt it throughout the cooking process. Top it with a little grated cheese and some sour cream and enjoy!

Feb 19, 2010

{cupakes}


vanilla cupcake recipe source: Joy of Baking
chocolate cupcake recipe source: Joy of Baking
My best friend is getting married! In honor of that special occasion I threw her a party to celebrate with all our friends. She loves chocolate and vanilla cupcakes so I searched online for the perfect recipes. Joy of Baking had some good looking options for a chocolate cupcake and a vanilla cupcake that I decided to use.

More after the jump

Feb 17, 2010

{red pepper, red onion, goat cheese + bacon pizza}


recipe source: Love and Olive Oil
Not only was this pizza gorgeous to look at but it tasted just as good. The crust is brushed with a mixture of olive oil, garlic and red pepper flakes. Its then topped with spinach, red onions, mushrooms, goat cheese, roasted red peppers and bacon. Lots of crunchy bacon bits. John loved this and said it balanced out all the veggies perfectly. This is by far one of the best pizza's we've ever had. It was incredibly simple to put together and has been added to our favorites.

More pics after the jump

Feb 16, 2010

{irish lamb stew}


recipe source: Eating Well
This stew was the exact comfort food needed for a cold winter night. The lamb was extremely tender and the seasonings perfect. The leeks were kinda stringy so I think next time I will chop them up to be a little smaller. Also, it definitely could have used more carrots and a little more salt. A very tasty stew though!

Feb 15, 2010

{curried butternut squash, caramelized onion + chicken pizza}

recipe source: Closet Cooking
Amazing. This is one of those cases when I wish I had multiple stomachs. The smooth butteriness of the butternut squash combined with the spice of curry and sweet caramelized onions was devine. I roasted the butternut squash halved, brushed with olive oil, topped with curry at 400ºF for 50 minutes until it was fork tender. Goat cheese is my go-to cheese so I used it instead of gorgonzola. I sliced up one and a half chicken breasts and cooked it in the pan with a chopped garlic clove and a little olive oil. Cilantro is one of those things that if you don't use it almost immediately it goes bad so I didn't have any on hand. I imagine it would have only enhanced the flavors. I brushed the pizza crust with some olive oil and grated parmesan cheese and popped it in the oven. It came out perfect.

More pics after the jump

Feb 14, 2010

{valentines weekend 2010}

John and I took a weekend getaway to Richmond, VA for valentines this year. It was a perfect weekend of climbing and eating delicious food. Even with the real fire at our hotel, it was perfect.

For our "fancy" dinner out we went to Kuba Kuba, a local Cuban restaurant tucked in a beautiful neighborhood in downtown Richmond. It is a small restaurant, but very popular. We waited for only about 30 minutes before being seated, all the while smelling the delicious aromas coming from the grills right behind us. Neither of us had ever had Cuban food before so we were excited to try it all. We tried the coconut soda to start with...it was very sweet but still tasty.

More after the jump

Feb 10, 2010

{tomato, goat cheese and carmelized onion tarts/pizzas}

recipe source: Piece of Cake
It took about an hour total to do the prep work, cooking and baking of the pies. Caramelizing the onions took about 30 minutes to do. Assembly took maybe 5 minutes and then they cooked for 20 minutes. The aromas in the kitchen were delicious throughout the entire process.

More pics after the jump

Feb 8, 2010

{dolmas wrap}

recipe source: Eating Well
The dolmas wraps are a delicious meal, but much better for a lunch vs. a dinner. Dolmas are a Middle Eastern food consisting of chopped veggies or ground meat stuffed into grape leaves. You can usually find them prepared in the grocery store's salad bar. The ones I found were veggie stuffed and about two of them fit into the size tortillas that we had. I chose to use flour tortillas instead of the lavash since its what we already had. It was refreshingly delicious and light. I think next time I'd add more lettuce and tomatoes just as slices inside the wrap...it would at least make the picture better looking.

Feb 7, 2010

{superbowl extravaganza part two}

onion ring recipe source: Eating Well
boneless buffalo wing recipe source: Eating Well
For our main superbowl course I used two recipes from Eating Well to create a healthy version of onioin rings and boneless buffalo wings. I only had panko breadcrumbs, but figured they'd work good enough. They didn't coat the onion rings as well as a finer breadcrumb, but it was suffiecient. The buffalo wings were made with boneless skinless chicken breasts. They came out very moist and with plenty of spicy flavor. I used a package to make the ranch dip that was the least healthiest thing on the plate, but helped to cool your tongue. Everything tasted just as good as the unhealthy version but came with much less guilt.

More pics after the jump

{superbowl extravaganza part one}


recipe source: Lifes Ambrosia
John and I are not pro-football people at all. However, we watch the superbowl each year simply for the commercials. This year I planned a typical superbowl party meal for the two of us that was slightly healthier than the norm.

The menu:

cream cheese and bacon stuffed jalapenos
boneless buffalo wings
onion rings

See more pics of the cream cheese and bacon stuffed jalapenos after the jump

Feb 6, 2010

{beef chili}


recipe source: Eating Well
What better way to warm up after canon balls in two feet of snow than with some warm chili. The recipe didn't actually call for using a slow cooker, but I used one anyway. Playing in the snow sounded more fun than spending my snow day cooking. I cooked it on high for 4 hours and it turned out just as well as if I had done it the way they called for. We topped it with a little goat cheese and light sour cream and scooped it up with tostitos.

I altered the recipe by using ground beef instead of beef round. Now that I'm looking at the recipe again, I think I forgot the beer, that might have helped the flavor out. It all tasted good, but was just not the best chili I've ever eaten. It didn't really thicken up like the picture Eating Well shows, but maybe the beer would have helped. I think next time, I'd add more salt and possibly a small can of tomato sauce to help it out.

More pics after the jump

{snow day + mexican breakfast burritos}

We were hit with an awesome snow storm that dropped two feet of snow on us! Since it snowed for about two days we were stuck inside for the most part.  It was a perfect day for some delicious mexican breakfast burritos. I've been making these for John in the mornings to take with him to eat on the road on his way to work since they are very portable. So far we've done several combinations that we like. Eggs, mushrooms, spinach and goat cheese. Eggs and turkey sausage. Black beans, eggs, sour cream, salsa and turkey sausage is the combo we chose for the snow day.

Recipe and pics after the jump

Feb 5, 2010

{butternut squash carbonara}

recipe source: Closet Cooking
John has been telling me that butternut squash is good and I found a recipe that looked good enough to try it out. I did learned you have to cook the squash ahead of time in order to make this dish so I roasted the squash halved and seeds removed for about 40 minutes in the oven at 400ºF. I brushed them with olive oil and sprinkled a little thyme and cinnamon on top for seasoning. I made the mistake of adding the egg mixture to the pan while still cooking so the sauce ended up getting cooked, but I also really didn't want to eat raw egg so it worked out. The flavors were a delicious combination of the creamy butternut squash and crispy bacon. I tossed it with some orecchiette noodles and grated some fresh parmesan cheese on top to finish it all off.

More pics after the jump

Feb 4, 2010

{chicken taco chili}

recipe source:: Ginas WW Recipes
This is hands down the best chili we've ever had. The flavor was a perfect combination sweet and spicy. Since the chicken ends up being shredded, I only put in 1.5 pieces of chicken and it turned out to be plenty. There is so much stuff in this chili that it didn't matter if there wasn't as much chicken. It definitely made 10 or more servings and has kept very well in the fridge. We served it over some yellow rice with a little sour cream and grated mozzarella cheese on top. One of the best things about this chili was that it was ridiculously simple and cheap to make since most of the ingredients were canned items. Make this.

More pics after the jump

Feb 3, 2010

{spaghetti with sauteed chicken + grape tomatoes}

recipe source:: Ginas WW Recipes
Six cloves of garlic. Need I say more?

The chicken was seasoned with some oregano, basil, cinnamon, salt + pepper. Six cloves of garlic were chopped up and sauteed with the grape tomatoes. I used orecchiette pasta instead of spaghetti noodles and tossed it all together. Topped with some freshly grated parmesan cheese and it took all of 30 minutes to do. It was a very light and delicious dish.

More pics after the jump

AddThis